
Halloween isn’t just about costumes and scary movies—it’s a time for fun traditions, family bonding, and yes, delicious treats. Among the most iconic Halloween snacks are Halloween sugar cookies. These buttery, crispy-edged, soft-centered cookies come to life with spooky shapes and vibrant decorations that are just as fun to make as they are to eat. This ultimate guide walks you through everything you need to know: from ingredients and techniques to decoration ideas, kid-friendly projects, allergy-friendly options, storage tips, and more. Whether you’re hosting a party or just want to enjoy a cozy baking day with your kids, Halloween sugar cookies are the perfect festive treat.
Table of Contents
Why Halloween Sugar Cookies Are a Seasonal Favorite
Creativity Meets Tradition
Halloween sugar cookies stand out not only for their taste but for the fun and creativity they invite. Unlike many other desserts, sugar cookies hold their shape during baking, making them ideal for using Halloween-themed cookie cutters—think pumpkins, witches’ hats, ghosts, and skeletons.
A Treat for All Ages
Kids love cutting out spooky shapes and decorating them with sprinkles and candy eyes. Adults enjoy the buttery flavor and the soft-yet-slightly-crisp texture. Whether you prefer frosting them with royal icing or buttercream, sugar cookies are endlessly customizable.
A Seasonal Tradition
In many homes, Halloween cookie baking becomes an annual tradition. The joy of preparing dough, cutting out ghosts and bats, and decorating while sipping warm cider turns baking into memory-making. Community events, school parties, and fall festivals often feature sugar cookies as a staple snack because they’re easy to transport and decorate in bulk.
Essential Ingredients for Halloween Sugar Cookies
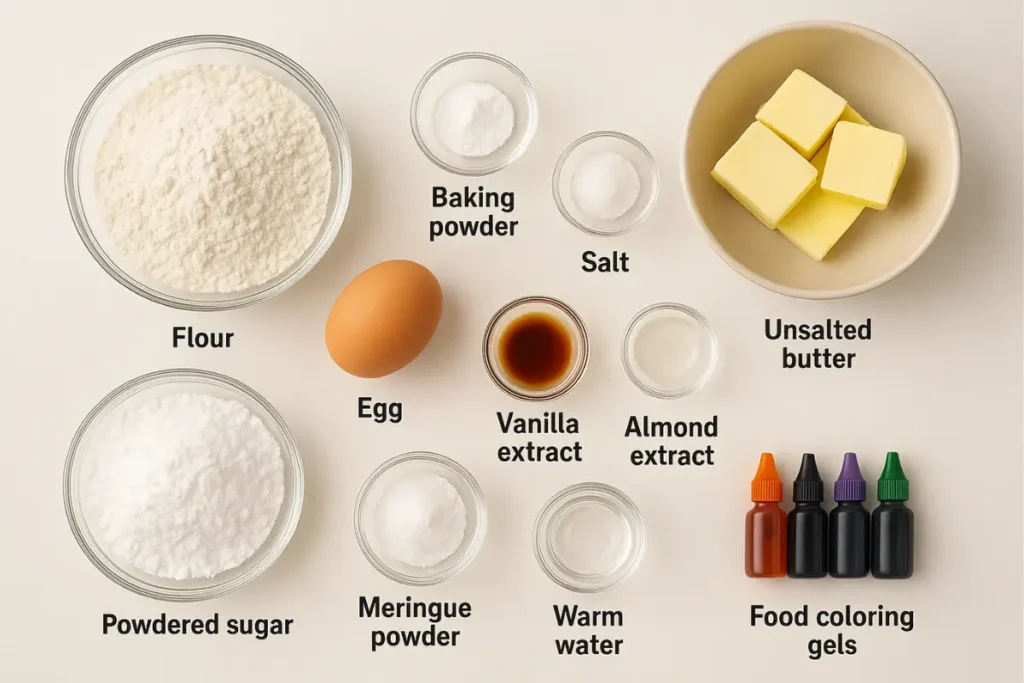
The Core Ingredients
Classic sugar cookies only require a few ingredients, but quality matters:
| Ingredient | Role | Tip |
| Unsalted Butter | Adds richness and softness | Use softened, not melted butter |
| Granulated Sugar | Sweetens and helps with spread | Cream thoroughly with butter |
| All-Purpose Flour | Gives structure | Sift for a smoother dough |
| Eggs | Bind and add moisture | Use room temperature eggs |
| Vanilla Extract | Enhances flavor | Use pure extract for better taste |
These basics form the perfect sugar cookie base.
Halloween-Themed Additions
To make your cookies scream “Halloween”:
- Gel Food Coloring: For bold hues like orange, black, green, and purple without thinning the dough or icing
- Spices: Cinnamon, nutmeg, and pumpkin spice add autumn warmth
- Flavors: Almond extract, maple syrup, or cocoa powder for variety
Choosing Frosting & Toppings
- Royal Icing: Dries hard—ideal for detailed designs like spider webs or jack-o’-lantern faces
- Buttercream: Soft and creamy—perfect for easier or kid-friendly decorating
Don’t forget the fun extras: colored sugar, sprinkles, candy eyes, edible glitter, and mini chocolate pieces to bring your cookies to life.
Step-by-Step Sugar Cookie Recipe
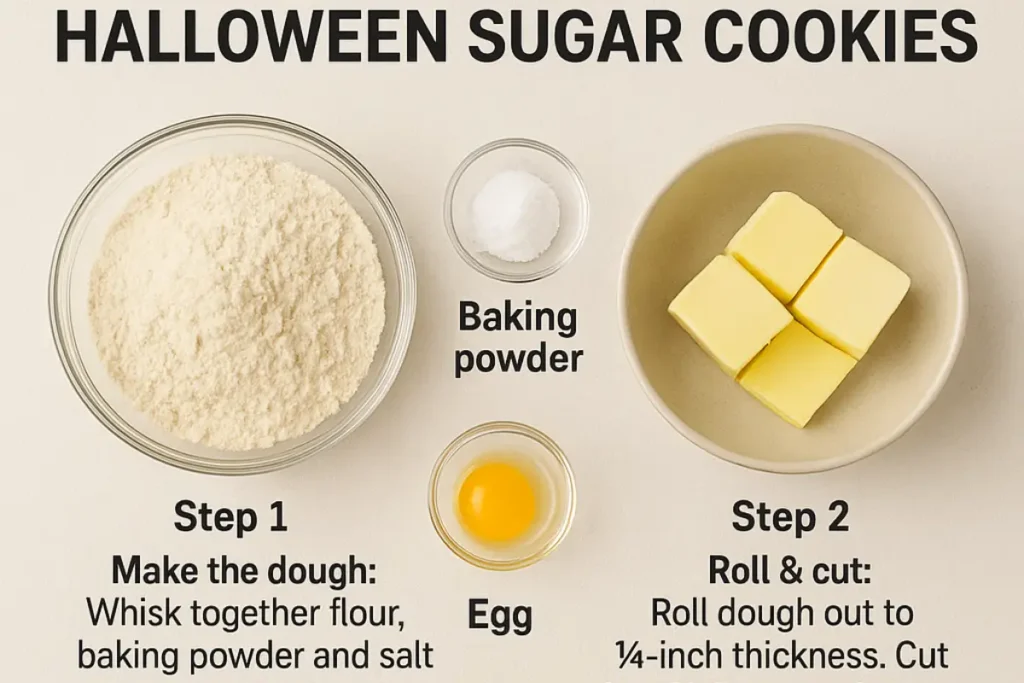
1. Make the Dough
- Cream butter and sugar until fluffy
- Mix in eggs and vanilla extract
- Slowly add sifted flour
- Divide and color dough if desired
- Chill for at least 1 hour to help cookies keep their shape
2. Roll, Cut, and Shape
- Roll out dough to about ¼ inch thick
- Use Halloween cookie cutters or cut freehand with a knife
- Dip cutters in flour to prevent sticking
- Place cookies on a parchment-lined baking sheet
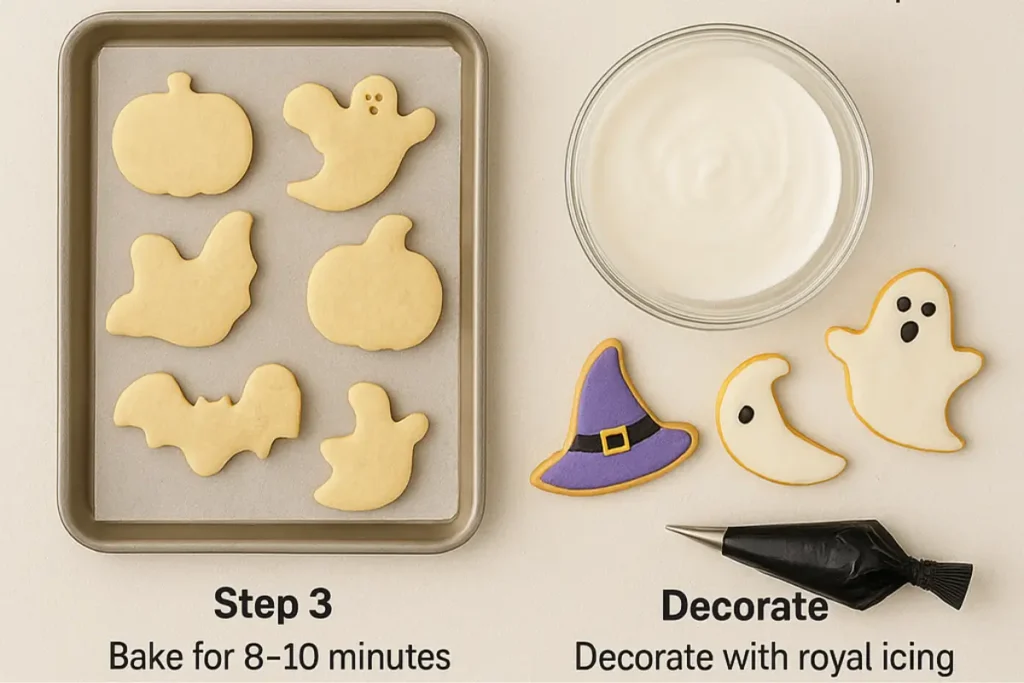
3. Bake
- Bake at 350°F (175°C) for 8–10 minutes
- Cookies should be just golden at the edges
- Cool on a wire rack before decorating
Pro Tip: Slightly underbake for a softer bite that won’t crack when icing.
Decorating Ideas for Halloween Sugar Cookies
Royal Icing Techniques
Start with a thicker icing to outline, then fill (or “flood”) the center with a thinner version for smooth coverage. Create:
- Cobwebs: White lines over a black base, pulled with a toothpick from center outward
- Ghosts: White flooded base, black icing eyes before it dries
- Skeletons & Mummies: Layer piped lines for a bandaged or bony effect
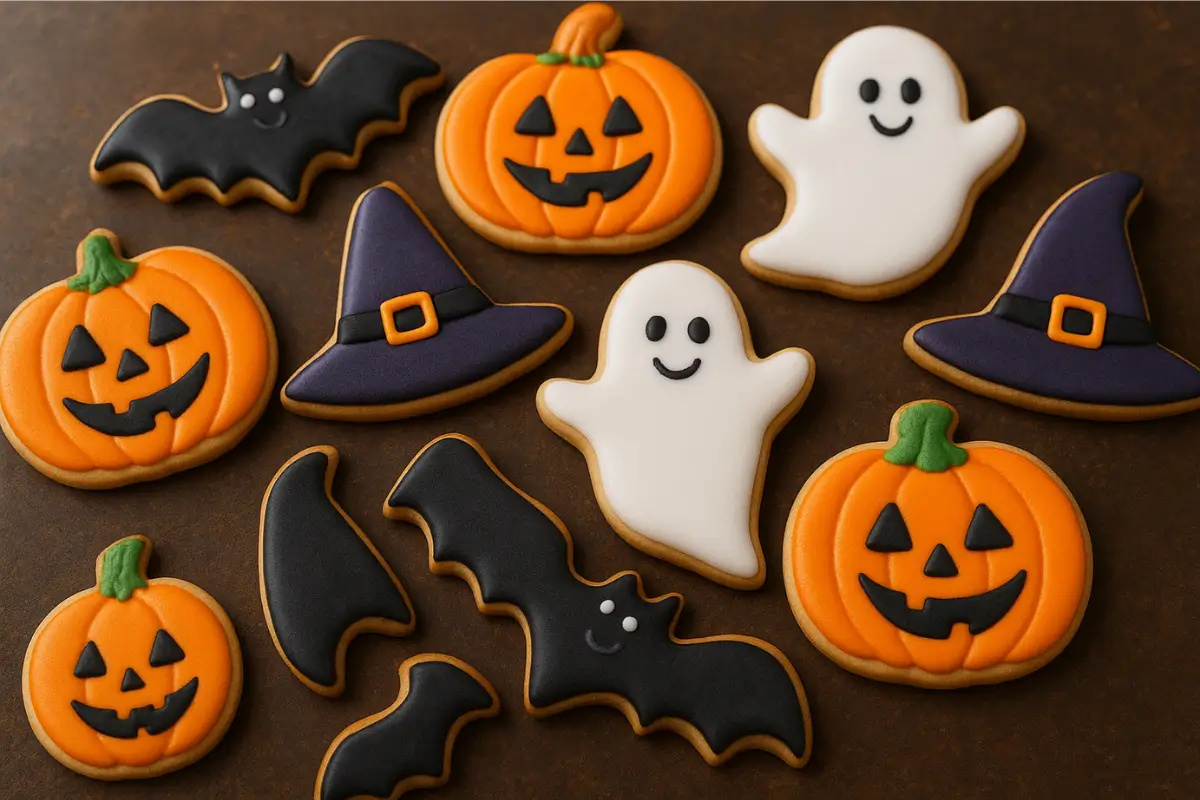
🎃 Fun Halloween Shapes
- Pumpkins: Orange icing, green stems, jack-o’-lantern faces
- Ghosts: White with eyes—keep it simple or spooky
- Bats: Black icing and candy eyes
- Spiders: Round cookies with chocolate centers, piped legs, and candy eyes
✨ Toppings for Extra Flair
- Sprinkles: Orange, purple, and black to match the season
- Candy Eyes: Instantly turn cookies into monsters
- Edible Glitter: Add sparkle for party-ready treats
Mixing textures—like soft icing, crunchy sugar, and chewy candy—elevates both look and taste.
Tips for Baking Success
How to Prevent Spreading
- Chill the dough after cutting, not just before rolling
- Don’t over-cream butter and sugar—too much air causes puffiness
- Measure flour accurately to avoid soft or overly dense cookies
Bake Evenly and Consistently
- Use a rolling pin with guides to ensure uniform thickness
- Bake one sheet at a time, on the middle rack
- Rotate the pan halfway through baking
- Use parchment or silicone baking mats instead of greasing the tray
Storage and Freshness
- Store cooled, decorated cookies in an airtight container with wax paper between layers
- Keep at room temperature for up to a week
- For longer storage:
- Freeze undecorated cookies in freezer-safe bags
- Freeze decorated cookies only after icing fully dries; wrap individually in plastic
Kid-Friendly and Allergy-Friendly Options
🍭 Involving Kids
Halloween sugar cookies are a perfect kitchen activity for little hands:
- Let kids cut out shapes or use stamps
- Create decorating stations with pre-filled piping bags, bowls of sprinkles, candy pieces, etc.
- Use buttercream or simple icing for easier cleanup
🌾 Allergy-Friendly Swaps
| Regular Ingredient | Allergy-Friendly Alternative |
| All-purpose flour | Gluten-free 1:1 blend |
| Butter | Vegan butter or coconut oil |
| Eggs | Flax eggs or applesauce |
| Milk (for icing) | Almond, oat, or soy milk |
These swaps allow everyone to enjoy festive cookies safely.
💚 Healthier Options
Want spooky treats without sugar overload?
- Reduce sugar in the dough by one-third
- Use whole wheat pastry flour for added fiber
- Mix Greek yogurt with powdered sugar for a tangy glaze
- Decorate with dried fruit, coconut flakes, or naturally colored toppings
Conclusion: Halloween Sugar Cookies as Sweet Memories
Halloween sugar cookies are more than a dessert. They’re:
- A creative outlet
- A family bonding activity
- A seasonal tradition
From mixing dough to decorating detailed faces and spooky shapes, each cookie is a chance to make memories. Whether you’re baking with your kids, preparing allergy-friendly versions, or hosting a Halloween party, sugar cookies are a festive and personal treat. So grab your rolling pin, dust off your cookie cutters, and turn your kitchen into a haunted cookie workshop. These cookies won’t just delight your guests—they’ll become part of your Halloween story for years to come.
Halloween Sugar Cookies FAQs
How far in advance can I make them?
Undecorated cookies: up to 1 week at room temp or 3 months frozen
Decorated cookies: best made 2–3 days ahead for freshness
How do I keep decorated cookies fresh?
Store in an airtight container with wax paper layers
Keep at room temperature in a dry, cool place
Avoid the fridge—moisture can ruin icing designs
Can I freeze cookies before decorating?
Yes!
Bake and cool the cookies
Freeze in layers separated by parchment
Thaw at room temperature before decorating
How do I get vibrant icing colors?
Use gel or paste food coloring, not liquid
Let icing rest—colors deepen over time
Halloween favorites: black, orange, purple, neon green
What are easy designs for beginners?
Start simple:
Ghosts: White icing with two black dots
Pumpkins: Orange circle, green top, black face
Monsters: Use candy eyes and colorful frosting on round cookies
No piping mastery required!